User Guide
Create a UPHost
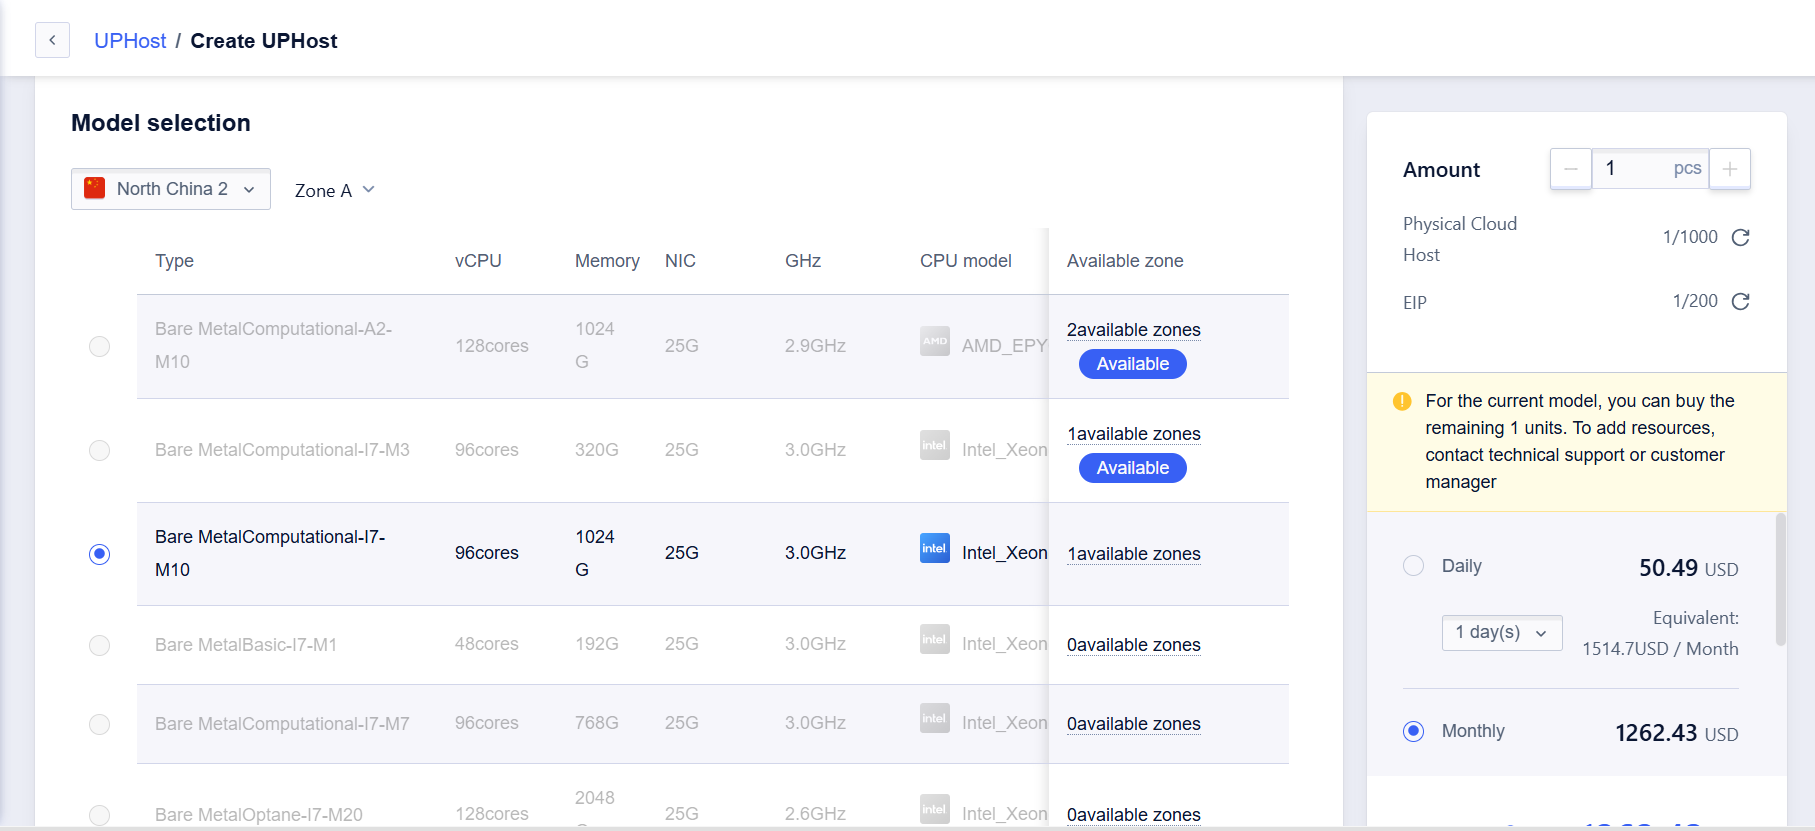
In the XXXCloud console, select the UPHost product and click on [Create UPHost] to enter the creation page.
On the creation page, select the region, availability zone, machine type, image, etc., and set the network and management information. Click on [Buy Now], and after payment, you will be automatically redirected to the host management page. After the host enters the running status, you can start using it.
Tips:
- If your account does not have permissions for certain regions (not visible in the console), please contact your account manager or provide feedback to SPT.
- UPHost currently only supports daily, monthly and yearly payments, of which 17% off is available for yearly payments, and hourly payments are not supported for the time being.
- If resources appear sold out in the console, please contact your account manager or provide feedback to SPT for the exact resource launch time.
- If the console does not offer configurations that meet your business needs, feel free to provide feedback through any channel, and the product team will evaluate it accordingly.
UPHost Management
Every UPHost can perform basic operations such as start, shutdown, restart, reinstall, and delete, with support for batch processing.
Tips:
- Reinstalling the system does not incur additional costs.
- When deleting a host, the cost for the remaining time will be automatically refunded.
Emergency Login
The emergency login function differs from the VNC login provided by cloud hosts. Its purpose is to allow you to log into the machine at the first opportunity to troubleshoot in case of a host malfunction. Of course, you can also use this function to replace SSH or jump server login methods.
Tips:
- Some UPHosts do not currently support IPMI features. If there is a network disconnection or downtime, please urgently contact SPT. All hosts will support IPMI features by the end of April 2020.
Configure Java Environment
Please visit the official Java website and follow the instructions to install the latest Java runtime environment.
Configure Java Security List
Take Windows as an example. Open Control Panel -> Select Java -> Security tab -> Edit Site List.
Based on the availability zone of your UPHost, configure the following addresses as exceptions:
| Region | Availability Zone | IP |
|---|---|---|
| North China(Beijing2) | Zone B | 123.59.90.26 |
| North China(Beijing2) | Zone C | 106.75.0.135 |
| North China(Beijing2) | Zone D | 125.59.130.41 |
| South China(Guangzhou) | Zone B | 106.75.128.62 |
| Hong Kong | Zone A | 23.91.96.36 |
Console Login
In the console menu, select: Emergency Login. At this point, a jnlp file will be downloaded. If you have configured the Java environment, you can open this file to log in to the UPHost normally.
Please ignore any related security warnings.
For a better user experience, it is recommended to use Firefox or Chrome for login operations.
Monitoring
UPHosts support monitoring functions, with monitoring indicators consistent with cloud hosts.
However, installing a monitoring agent is necessary (XXXCloud Monitor Agent). Check the Monitoring Agent Instructions for detailed steps.
Note: Windows UPHosts do not currently support this feature.
Temperature Monitoring Installation for a GPU UPHost
It is recommended to install UMA on your GPU UPHost for temperature monitoring.
Install NVIDIA Driver
- Visit the NVIDIA website to get the download address
- Select a specific model for Product Family.
- Select CUDA version supported by the driver for CUDA ToolKit. The default version will be chosen if you don’t select any.
- After selection, click Search → Download, and copy the link address (Example for A100 in the images above)
- Enter the host and execute the command to download the driver (wget followed by the copied link address):
wget {copied link address from the previous step}- Check if gcc and make software libraries are installed, and install gcc and make
## Use 'which make' to check if make is installed, use command '# sudo apt-get install make' to install ## Use 'gcc --version' to check if gcc is installed, use command '# sudo apt-get install gcc' to install - Start installation: Execute
sh NVIDIA-xxxxxxx.runto start the driver installation. Note: Add sudo before the command if there are permission issues. - Verify the NVIDIA driver: Execute
nvidia-smi
Install UMA
Refer to the Monitoring Agent Instructions for details.
In the Monitoring > Monitoring Template section, you can additionally add a GPU temperature monitoring item. It is recommended to set the alarm threshold at 90°C.