Create and Import Local Images using Packer
Overview
Packer is a lightweight open-source tool for automatic image packaging launched by Hashicorp Company (for more details, refer to the previous document). XXXCloud now supports one-click importing of homemade local images into the XXXCloud cloud platform thanks to the integration of Packer.
Related Links
For installing Packer
Open Source Repository Address
Feel free to contribute codes to XXXCloud Packer Builder
Image Import Example
Next, a CentOS image will be created and imported using Packer. It is shown below:
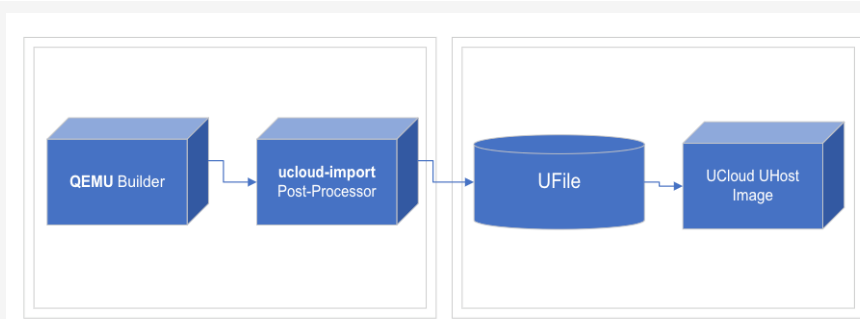
Packer first makes a RAW image using QEMU Builder , stored in a local directory specified by user, and then uses import Post-Processors to store the local image to a UFile specified by the user, and automatically imports it into the XXXCloud cloud platform.
Environment setup
Install Packer
- Follow the official installation document to install Packer
Configure default User
Set keys TEST_PUBLIC_KEY, TEST_PRIVATE_ KEY and project ID TEST_PROJECT_ID as global environment variables (recommended), or specify public_key、 private_key、 project_id explicitly in the json file.
Install QEMU
- Follow the official installation document , and you can use command lines to install it. MacOS: brew install qemu, CentOs: yum install qemu-kvm, Ubuntu: apt-get install qemu
Create a UFile bucket
- Follow the official document
Write a JSON File
Let’s take the example of creating and importing a CentOS 6.10 custom image using QEMU on a macOS system. First, create a clean empty folder as the workspace, switch to this directory, and write a JSON specification file (e.g., local.json) as follows:
{"variables": {
  "test_public_key": "{{env `TEST_PUBLIC_KEY`}}",
  "test_private_key": "{{env `TEST_PRIVATE_KEY`}}",
  "test_project_id": "{{env `TEST_PROJECT_ID`}}",
  "disk_size": "4096",
  "iso_checksum": "0da4a1206e7642906e33c0f155d2f835",
  "iso_checksum_type": "md5",
  "iso_name": "CentOS-6.10-x86_64-minimal.iso",
  "ks_path": "centos-6.10/ks.cfg",
  "mirror": "http://mirrors.ustc.edu.cn/centos",
  "mirror_directory": "6.10/isos/x86_64",
  "template": "centos-6.10-x86_64"
},
  "builders":[
    {
      "type": "qemu",
      "boot_command": [
        "<tab> text ks=http://{{ .HTTPIP }}:{{ .HTTPPort }}/{{user `ks_path`}}<enter><wait>"
      ],
      "boot_wait": "10s",
      "disk_size": "{{user `disk_size`}}",
      "http_directory": "http",
      "iso_checksum": "{{user `iso_checksum`}}",
      "iso_checksum_type": "{{user `iso_checksum_type`}}",
      "iso_url": "{{user `mirror`}}/{{user `mirror_directory`}}/{{user `iso_name`}}",
      "output_directory": "packer-{{user `template`}}-qemu",
      "shutdown_command": "echo 'packer'|sudo -S shutdown -P now",
      "ssh_password": "test_packer",
      "ssh_port": 22,
      "ssh_username": "root",
      "ssh_timeout": "10000s",
      "vm_name": "{{ user `template` }}.raw",
      "net_device": "virtio-net",
      "disk_interface": "virtio",
      "format": "raw",
      "use_default_display": "false",
      "qemuargs": [
        ["-display", "cocoa"]
      ]
    }
  ],
  "post-processors":[
    {
      "type":"import",
      "public_key": "{{user `test_public_key`}}",
      "private_key": "{{user `test_private_key`}}",
      "project_id": "{{user `test_project_id`}}",
      "region":"cn-bj2",
      "ufile_bucket_name": "packer-test",
      "image_name": "packer_import_test",
      "image_os_type": "CentOS",
      "image_os_name": "CentOS 6.10 64bits",
      "format": "raw"
    }
  ]
}
This sets up a qemu Builder and an import Post-Processors , where the UFile bucket name and other information are configured.
Write Kickstart Files
Based on the http_directory and boot_command configured in the QEMU section of the above JSON file, a ./http/centos-6.10/ directory needs to be created in the JSON file’s directory to store the Kickstart file ks.cfg, as follows: (Kickstart reference document )
install
cdrom
lang en_US.UTF-8
keyboard us
network --bootproto=dhcp
rootpw test_packer
firewall --disabled
selinux --permissive
timezone UTC
unsupported_hardware
bootloader --location=mbr
text
skipx
zerombr
clearpart --all
autopart
auth --enableshadow --passalgo=sha512
firstboot --disabled
reboot

%packages --nobase --ignoremissing
sudo
gcc
make
%end
Execute the Command Line
By running the command packer build local.json, you can create and import a custom image in one click.